The Sync Gen II Pro from Innerclock Systems is a dream come true for people wanting to use analogue gear – especially drum machines – but record on a computer and keep everything in sync.
It’s sole purpose on this earth is to generate razor-sharp clock from your DAW to keep all those analogue machines moving together, with a few nifty features thrown in. You can run up to five machines that take DIN sync (eg. TR-606, TR-808), five more that take MIDI clock (eg. TR-909, TR-707, Sequential Drumtraks, Korg Electribe) and one with a trigger pulse (eg, Roland CR-78).
One look at the hardware and you can tell these guys mean business. It’s beautifully made, and feels like a serious quality piece of gear – nice brushed metal. No plastic in sight.

I am running my Sync Gen with Logic Pro on a MacBook Pro via an Apogee Ensemble audio interface. Doesn’t really matter what audio interface you’re using, as long as it has more than 2 outputs, as the Sync Gen uses 2 audio outputs to generate its super-accurate clock. I got it working without too much pain, but I thought it might be useful to show how I got the basics working, then moved to a few other tricks – including getting a TR-808 grooving and SWINGING!
First steps
OK, so I’ll presume you have unpacked it from its box. There will be a little USB key. Pop that into your computer and open the drive that appears on the desktop. It will probably be called “NO NAME”. In there are the software installers, PDF manual and a text file with your serial number, which you need when you open the plugin for the first time to complete authorisation.
Next you need to hook up the hardware. Power up the Sync Gen (always helps) and make a decision on which two outputs from your audio interface you’re going to dedicate to it – I chose 7/8 from the Apogee Ensemble. Plug the LEFT one of the pair (7 in my case) into the SYNC input on the Sync Gen, and the RIGHT (8 in my case) into the TRANSPORT input using 1/4″ jacks. Maybe obvious, but check the jacks are noise-free and working.
Setting up in Logic
Create a new software instrument, routed to the outputs you are using for the Sync Gen.
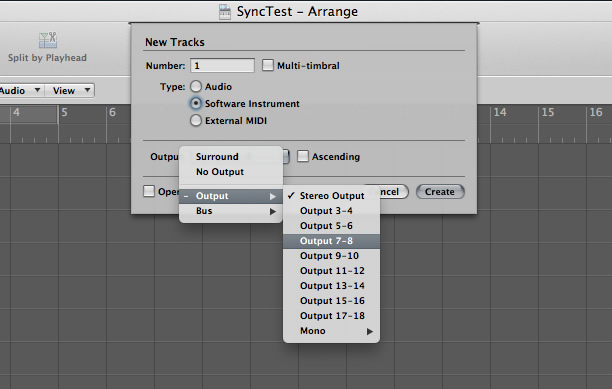
Click and hold the Instrument Slot on your new software instrument channel strip and locate:
AU Instruments > Innerclock Systems > Sync Gen Pro > Stereo
Make sure you choose the Sync Gen AU Instrument, not the AU MIDI-controlled Effects one.

First time you fire it up you will be asked to enter your serial number – this is the one from the text file on the supplied USB key – NOT the number on the unit. Then you have to close and re-open the plugin, which looks like this:
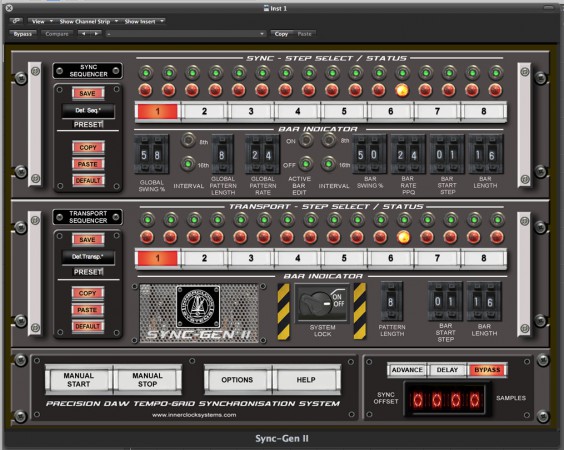
You can actually just close the plugin window for now, as you won’t need to change anything at first.
Setting up your drum machine
Choose an analogue machine to plug in. I started with my Roland TR-606, checked it was working by running a pattern with its own clock, and plugged it into the “D1” output on the Sync Gen – ie. DIN sync output 1. Power up the analogue machine, and set it to receive sync. In the case of the 606, this is just a switch on the left beside the DIN socket – you can choose between INPUT and OUTPUT for the sync – it needs to be set to INPUT.Now, open Logic. Best to start with a fresh project. One thing you need to be aware of is that putting heavy effects across your master channel strips – like the mastering setups in Logic – leads to ludicrous latency and you’ll just think the box isn’t working. So stick to low latency mode, and make sure you’ve nothing heavy running across your outputs.
Checklist…
- You have your dedicated audio interface output LEFT connected to SYNC input on the Sync Gen
- Dedicated audio interface output RIGHT to TRANSPORT input on the Sync Gen
- D1 output of the Sync Gen into the DIN sync input of your analogue drum machine
- Drum machine is switched on (and working!), and the SYNC is set to INPUT
And GO!
Now hit play on Logic. The Sync Gen should light up like a pinball machine… 4 lights across the front, locked to the tempo of your project. And your drum machine should be playing along, bang in time – possibly with a tiny bit of latency from your audio interface.
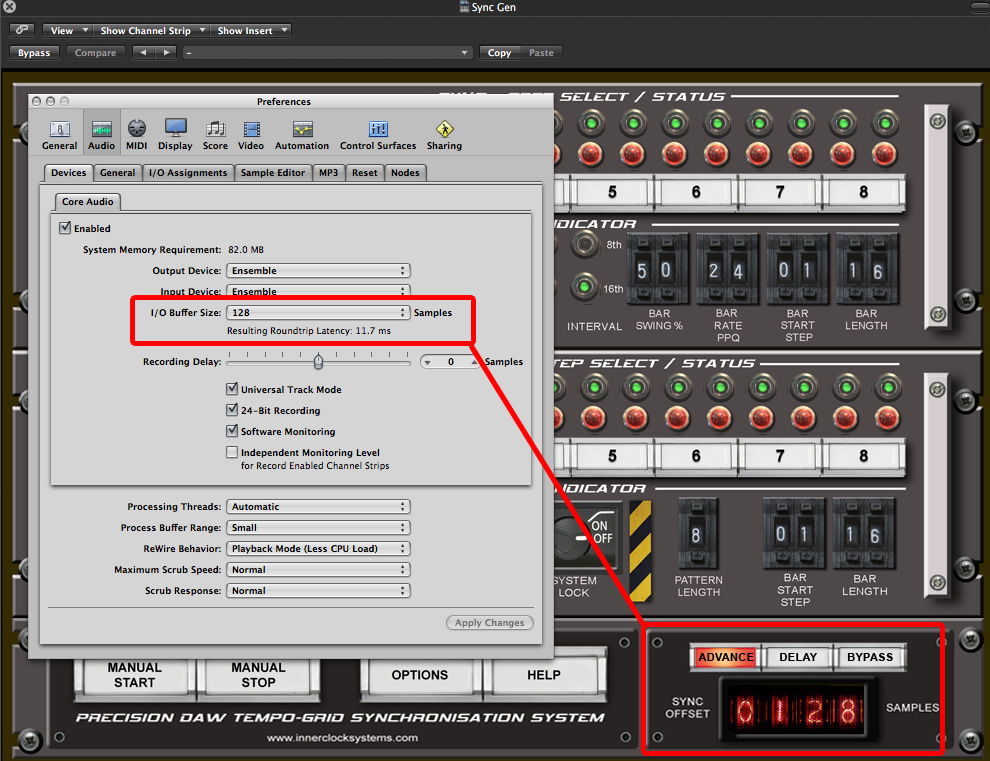
You can offset that inside Sync Gen. Open up the plugin window and change the “ADVANCE” setting bottom right to the number of samples you are seeing as your current latency setting. You will find this in File > Preferences > Audio as the value for “I/O Buffer Size” – mine is set to 128. So push the ADVANCE setting on Sync Gen to 128 and see how it sits… you may need to tweak it a bit, but with a bit of trial and error, you will have your machine locked right in to your DAW grid.